Making a Dino Game with Game Lab
I decided to try out Hack Club's Game Lab; it's a super easy way to make a game. To test it out, I implemented a simple dino game.
Tutorial
Warning!
This tutorial was made with gamelab version 0.2.3. If the code doesn't work,
try switching to that version.
Go to gamelab.hackclub.com. On the left, you'll see the editor, which has some starter code in it. the top right has the console where the game will run, and the bottom right has an editor for sprites and tunes.

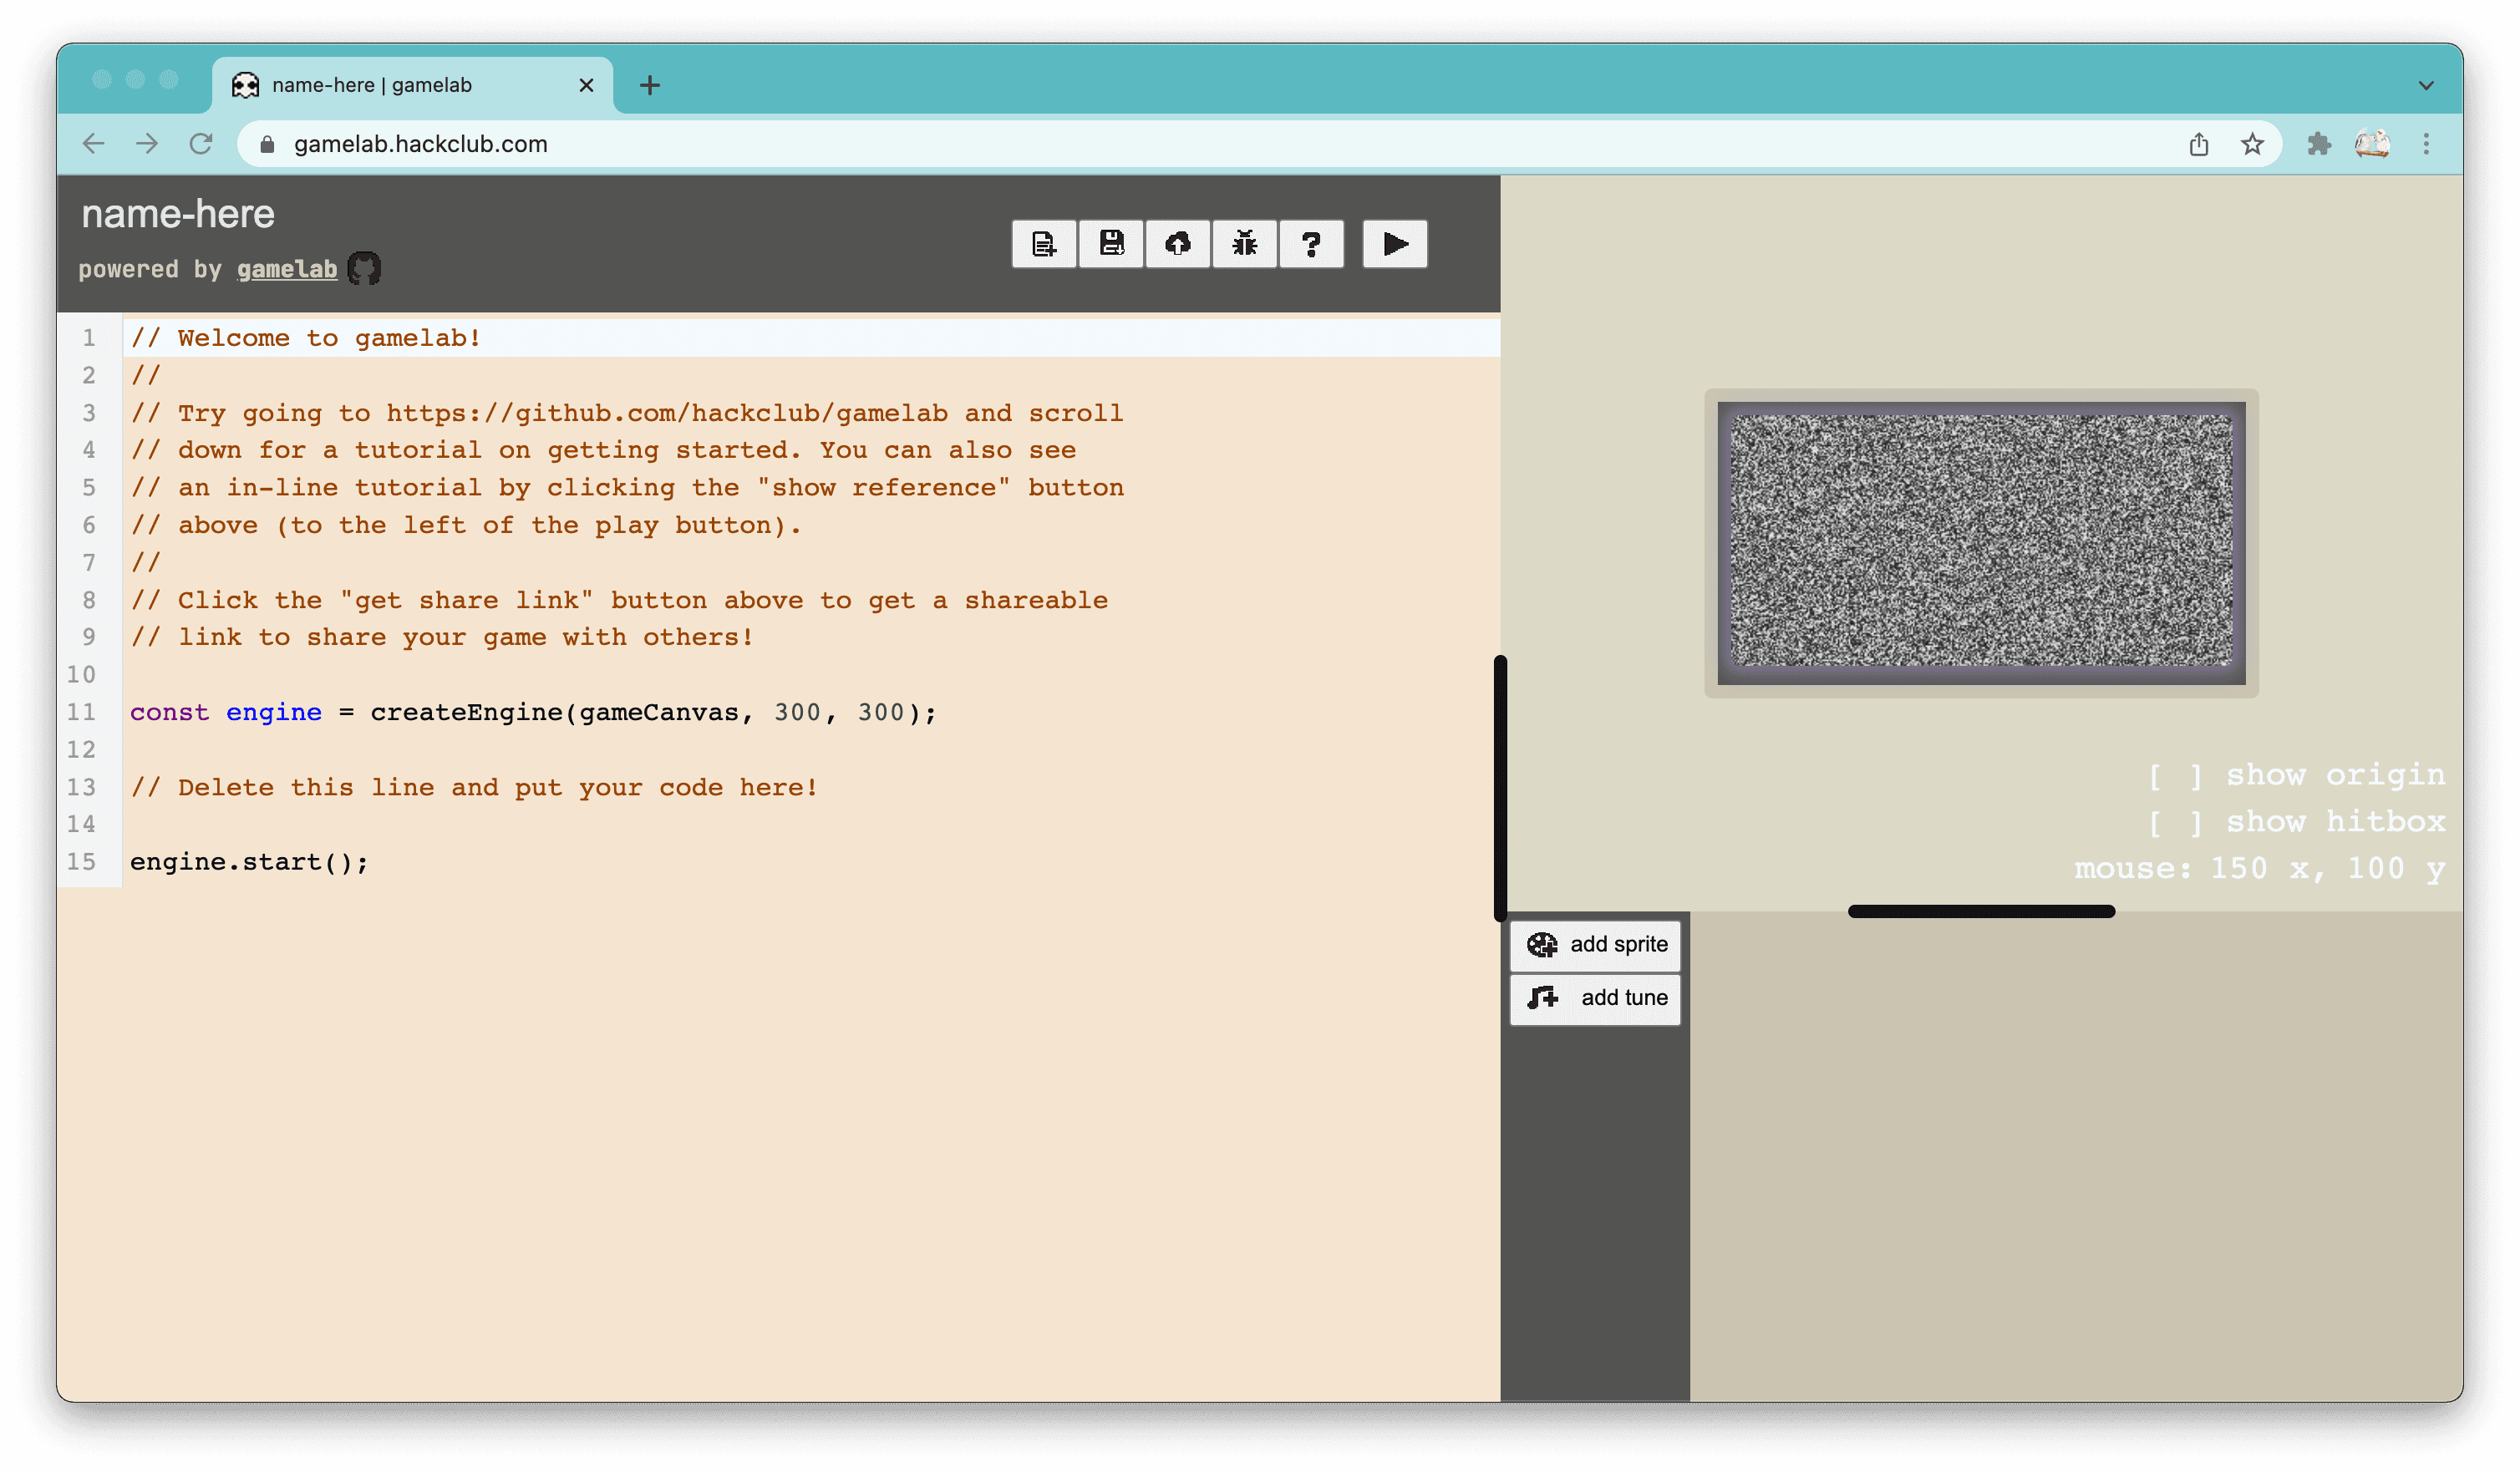
Here's the example code:
1const engine = createEngine(gameCanvas, 300, 300);
2engine.start();The first line initializes the game engine, and you can pass in the width and
height of the canvas as the second and third parameters to createEngine. The
second line starts the engine.
For our dino game, we'll create a canvas that is by .
1const e = createEngine(gameCanvas, 600, 300);
2e.start();Adding a sprite
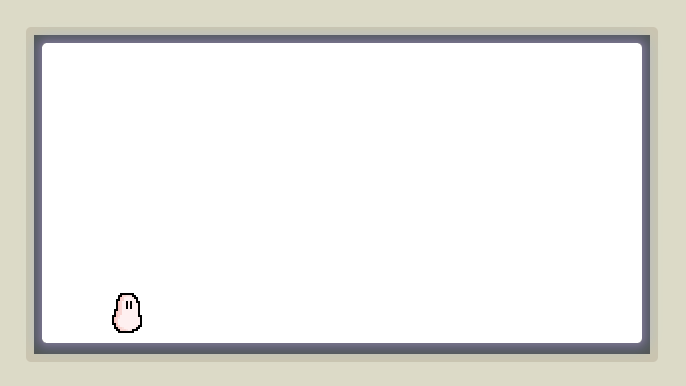
Add a sprite named player in the sprite editor. You can then draw your player;
mine is shown below. Once you've added a sprite, you can access it in the code
by using the variable player.


Let's add the player to the game! Using the e.add() function, we can add an
object.
1const e = createEngine(gameCanvas, 600, 300);
2e.start();
3
4// add the player
5e.add({
6 sprite: player,
7 solid: true,
8 x: 70,
9 y: 250,
10 scale: 2,
11});With that, our player will be added to the game. Run the game (you can use the shortcut Shift + Enter), and you'll see the player appear on the screen!
Coordinates are calculated such that the top left corner is at , and x
increases as we move left, while y increases as we move down. The default
origin for our object is at the top left, though this can be changed by setting
origin in the options passed to e.add(). So for our player, the top left of
the sprite is at .

Similarly, we can add a floor by making a sprite named floor, then updating
our code with:
1// add the floor
2e.add({
3  tags: ["floor"],
4  solid: true,
5  sprite: floor,
6  x: 0,
7  y: 290,
8  scale: 20,
9});We've also included a tag for the floor, which will be used later to identify it.
Making movement
Our game objects can also include a collides() function, which will be called
when the object collides with another object. The collides() function is
passed two arguments: the object itself and the object it has collided with.
We can get keypresses with the e.pressedKey() function, so we'll have the
player jump when the spacebar is pressed. We only want the player to be able to
jump when it's on the floor, so we'll check that the object we are colliding
with has a tag of floor. If the player is on the floor and the spacebar is
pressed, we can give it an upwards velocity, which will make it jump.
1e.add({
2  sprite: player,
3  solid: true,
4  x: 70,
5  y: 250,
6  scale: 2,
7  collides(me, them) {
8    // jump when space key is pressed
9    if (e.pressedKey(" ")) {
10      if (them.hasTag("floor")) {
11        me.vy = -680;
12      }
13    }
14  },
15});Now the player will go up when the spacebar is pressed, but it won't come back
down. To do that, we need to simulate gravity. Game objects can also have an
update() function that will be called every frame, so we can use this to
increase the y-velocity every frame. Feel free to play around with these values
to make the jumping seem realistic.
1e.add({
2  sprite: player,
3  solid: true,
4  x: 70,
5  y: 250,
6  scale: 2,
7  collides(me, them) {
8    // jump when space key is pressed
9    if (e.pressedKey(" ")) {
10      if (them.hasTag("floor")) {
11        me.vy = -680;
12      }
13    }
14  },
15  update(me) {
16    // gravity
17    me.vy += 48;
18  },
19});Adding obstacles
Draw a sprite with name obstacle, then we can add it to the game.
1// add an obstacle
2e.add({
3  tags: ["obstacle"],
4  sprite: obstacle,
5  origin: [1, 1],
6  x: 300,
7  y: 290,
8  scale: 2,
9});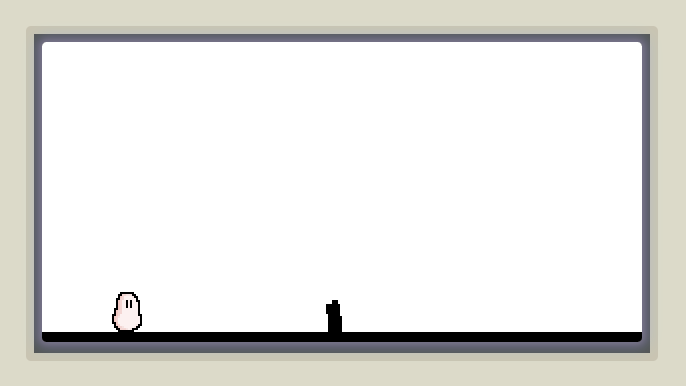
In the dino game, obstacles move left towards the player, while the player stays
in the same positions, so this is what we'll do. Give the obstacle an update()
function that moves it left at a constant speed. When the obstacle is off the
screen, we can remove it from the game.
1e.add({
2  tags: ["obstacle"],
3  sprite: obstacle,
4  origin: [1, 1],
5  x: 300,
6  y: 290,
7  scale: 2,
8  update(me) {
9    me.x -= 5;
10    if (me.x < 0) {
11      e.remove(me);
12    }
13  },
14});Since we'll want to continually add obstacles to the game, we can make an
addObstacle() function to reuse our code. We'll pass in the x position of
the obstacle. Replace the e.add() call with the code below:
1const addObstacle = (x) => {
2  e.add({
3    tags: ["obstacle"],
4    sprite: obstacle,
5    origin: [1, 1],
6    x,
7    y: 290,
8    scale: 2,
9    update(me) {
10      me.x -= 5;
11      if (me.x < 0) {
12        e.remove(me);
13      }
14    },
15  });
16};
17
18addObstacle(300);After the obstacle goes off the screen, we'll want to add another obstacle. We
can do this by calling the addObstacle function when the current obstacle
leaves the screen. We'll also add the initial obstacle at a position of so
it comes in from the right of the screen.
1const addObstacle = (x) => {
2  e.add({
3    tags: ["obstacle"],
4    sprite: obstacle,
5    origin: [1, 1],
6    x,
7    y: 290,
8    scale: 2,
9    update(me) {
10      me.x -= 5;
11      if (me.x < 0) {
12        e.remove(me);
13        addObstacle(620);
14      }
15    },
16  });
17};
18
19addObstacle(620);Ending the game
If the player runs into an obstacle, we need to end the game. In the player
object's collides() function, we'll check if the player has collided with an
obstacle, and if so, we can use the e.end() function to end the game. We'll
also add some text with the e.addText() function.
1collides(me, them) {
2  // jump when space key is pressed
3  // ...
4
5  // end the game if the player hits an obstacle
6  if (them.hasTag("obstacle")) {
7    e.end();
8    e.addText("GAME OVER", 300, 100, {
9      size: 28
10    });
11  }
12},Randomizing obstacles
We now have a playable dino game, but the obstacles all start at the same
position. Let's add some randomness to make this more interesting. To add
obstacles at random positions, we'll store the current obstacles in an array,
obstacles. When we need to add a new obstacle, we'll add it at a random
obstacle from the last obstacle in the array, which makes sure that the
obstacles have enough space between them.
We can use this function to get a random number between two values:
1const randInRange = (min, max) => Math.random() * (max - min) + min;And apply it by updating the addObstacle() function:
1// list of obstacles
2const obstacles = [];
3
4const addObstacle = (x) => {
5  const obs = e.add({
6    tags: ["obstacle"],
7    sprite: obstacle,
8    origin: [1, 1],
9    x,
10    y: 290,
11    scale: 2,
12    update(obj) {
13      obj.x -= 5;
14      if (obj.x < 0) {
15        e.remove(obj);
16        const nxt = Math.max(
17          620,
18          obstacles[obstacles.length - 1].x + randInRange(180, 400)
19        );
20        obstacles.shift();
21        addObstacle(nxt);
22      }
23    },
24  });
25  obstacles.push(obs);
26};
27
28// initialize 3 obstacles
29addObstacle(randInRange(620, 700));
30addObstacle(randInRange(900, 1050));
31addObstacle(randInRange(1250, 1400));Now, the obstacles will start at random positions, making the game a lot more fun!
Final code
Here's the code for the entire game. You can try it out here: https://gamelab.hackclub.com/?id=a9257c9fb5c19a077842fd7e0048e419. Let me know in the comments below if you make your own version of this game!
1const e = createEngine(gameCanvas, 600, 300);
2
3// add the player
4e.add({
5  sprite: player,
6  solid: true,
7  x: 70,
8  y: 250,
9  scale: 2,
10  collides(me, them) {
11    // jump when space key is pressed
12    if (e.pressedKey(" ")) {
13      if (them.hasTag("floor")) {
14        me.vy = -680;
15      }
16    }
17    // end the game if the player hits an obstacle
18    if (them.hasTag("obstacle")) {
19      e.end();
20      e.addText("GAME OVER", 300, 100, {
21        size: 28,
22      });
23    }
24  },
25  update(me) {
26    // gravity
27    me.vy += 48;
28  },
29});
30
31// add the floor
32e.add({
33  tags: ["floor"],
34  solid: true,
35  sprite: floor,
36  x: 0,
37  y: 290,
38  scale: 20,
39});
40
41const randInRange = (min, max) => Math.random() * (max - min) + min;
42
43// list of obstacles
44const obstacles = [];
45
46const addObstacle = (x) => {
47  const obs = e.add({
48    tags: ["obstacle"],
49    sprite: obstacle,
50    origin: [1, 1],
51    x,
52    y: 290,
53    scale: 2,
54    update(obj) {
55      obj.x -= 5;
56      if (obj.x < 0) {
57        e.remove(obj);
58        const nxt = Math.max(
59          620,
60          obstacles[obstacles.length - 1].x + randInRange(180, 400)
61        );
62        obstacles.shift();
63        addObstacle(nxt);
64      }
65    },
66  });
67  obstacles.push(obs);
68};
69
70// initialize 3 obstacles
71addObstacle(randInRange(620, 700));
72addObstacle(randInRange(900, 1050));
73addObstacle(randInRange(1250, 1400));
74
75e.start();